Full Stack Deployment: Setting Up CI/CD for Node.js Applications on AWS with Custom Domains
This comprehensive guide will walk you through establishing a professional CI/CD pipeline for Node.js applications on AWS EC2, complete with custom domain configuration.

In today’s competitive digital landscape, the ability to deploy applications quickly and reliably is essential for development teams. This comprehensive guide will walk you through establishing a professional CI/CD pipeline for Node.js applications on AWS EC2, complete with custom domain configuration. Whether you’re a solo developer or part of a larger team, these automation techniques will streamline your workflow and ensure consistent deployments.
Understanding CI/CD and Its Benefits
Continuous Integration and Continuous Deployment (CI/CD) revolutionizes the software development lifecycle by automating testing and deployment processes. Instead of manually transferring files and restarting services, a well-configured CI/CD pipeline handles these tedious tasks automatically when you push code changes to your repository.
The benefits include:
- Reduced human error during deployments
- Faster release cycles
- Consistent testing before production deployment
- Easier rollbacks when issues arise
- Better collaboration within development teams
Prerequisites
Before we dive into implementation, ensure you have:
- An active AWS account with permissions to create and manage EC2 instances
- A Node.js application ready for deployment (either existing or new)
- A GitHub repository containing your application code
- A domain name (if implementing the custom domain section)
Part 1: Setting Up Your AWS Infrastructure
Launching an EC2 Instance
Let’s begin by creating the server that will host your application:
- Log in to your AWS Console and navigate to the EC2 Dashboard
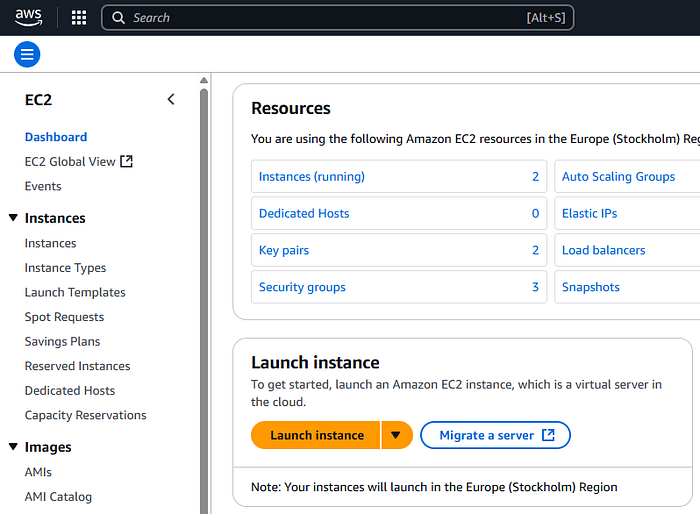
- Click the “Launch Instance” button
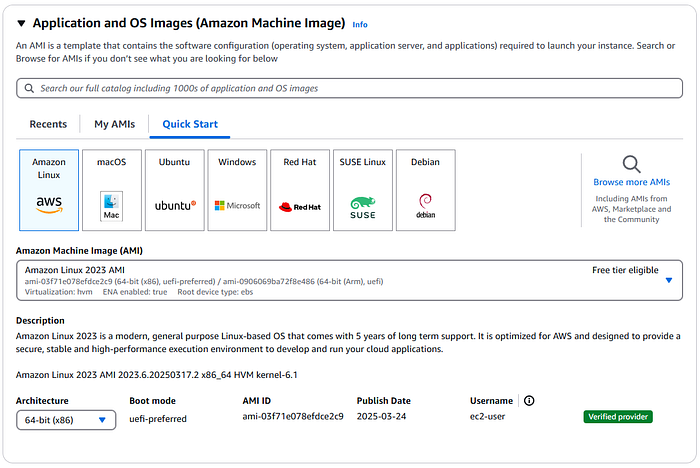
- Select an appropriate Amazon Machine Image (AMI). For Node.js applications, Ubuntu or Amazon Linux 2 are excellent choices due to their stability and widespread support
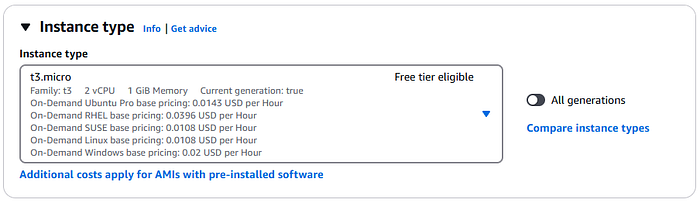
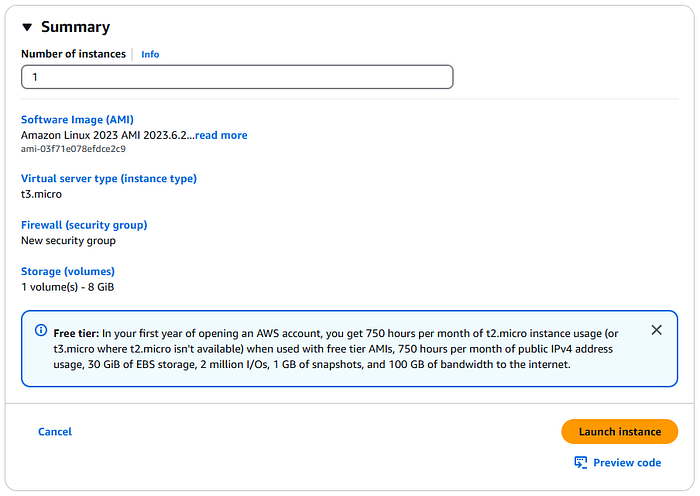
- Choose an instance type. For smaller applications or testing environments, the free-tier eligible t3.micro is sufficient. Production applications may require more resources depending on traffic expectations
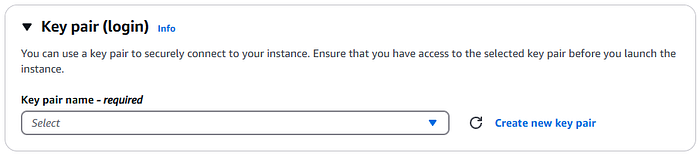
- Configure a key pair. This is critical for secure SSH access to your instance. Either create a new key pair or select an existing one, but ensure you download the private key file (.pem) if creating a new one

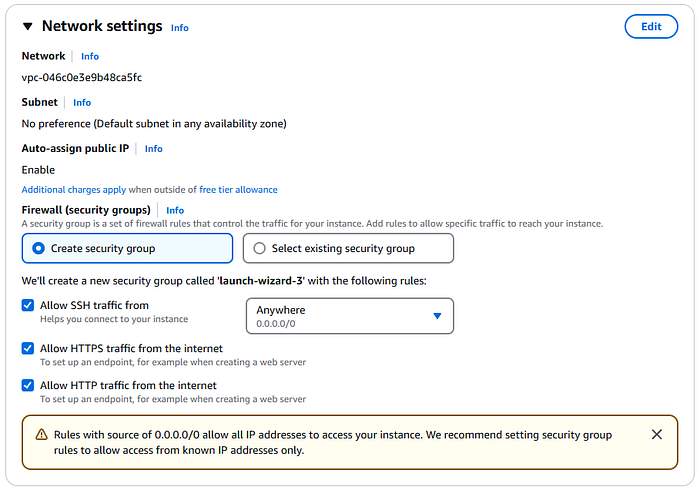
- Configure security groups to allow the necessary network traffic:
- SSH (port 22): Restrict to your IP address for security
- HTTP (port 80): Allow from anywhere (0.0.0.0/0)
- HTTPS (port 443): Allow from anywhere (0.0.0.0/0)
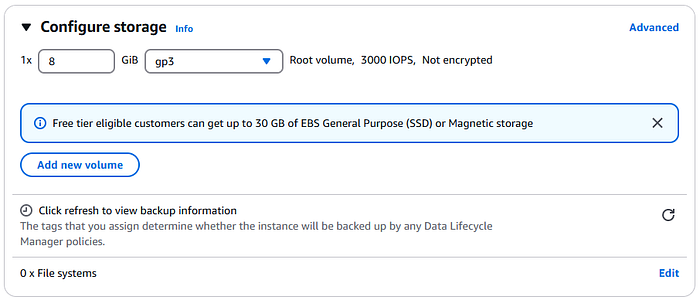
- Configure storage settings:
- For most Node.js applications, the default storage allocation (8 GB) is sufficient
- Use General Purpose SSD (gp2 or gp3) for balanced performance
- Consider increasing storage if you anticipate storing large media files, accumulating extensive logs, hosting databases locally (though a separate RDS instance is recommended for production)
- You can always increase storage later if needed
- Launch the instance and note the Public IP address assigned to it

Setting Up the Server Environment
After launching your EC2 instance, you’ll need to install the necessary software:
- Connect to your instance via SSH:
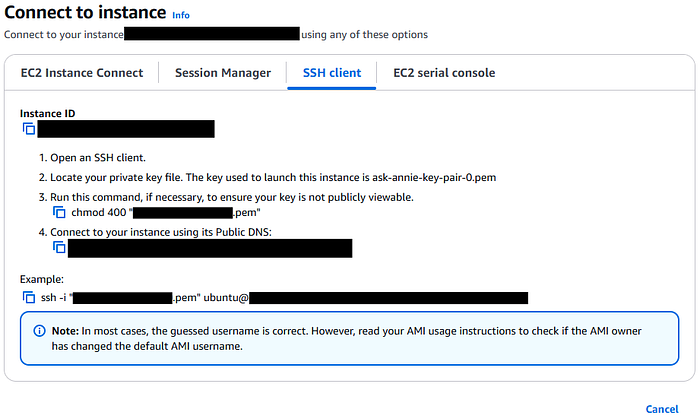
ssh -i /path/to/your-key.pem ubuntu@your-ec2-public-ip
- Update the package repositories:
sudo apt update
- Install Node.js and npm:
sudo apt-get install -y nodejs
- Install Nginx to act as a reverse proxy and check its status:
sudo apt-get install nginx
sudo systemctl start nginx
sudo systemctl enable nginx
sudo systemctl status nginx
- Install PM2, a process manager that will keep your Node.js application running:
sudo npm install -g pm2
At this point, navigating to your EC2 instance’s public IP address http://your-ec2-public-ip/ in a browser should display the default Nginx welcome page, confirming that your web server is working correctly.
Part 2: Configuring GitHub Actions for CI/CD
GitHub Actions provides an elegant way to implement CI/CD directly within your GitHub repository. We’ll set up a workflow that automatically deploys your application whenever changes are pushed to the main branch.
Setting Up a Self-Hosted GitHub Runner
Unlike GitHub’s cloud-based runners, a self-hosted runner gives you direct access to your EC2 instance during deployment:
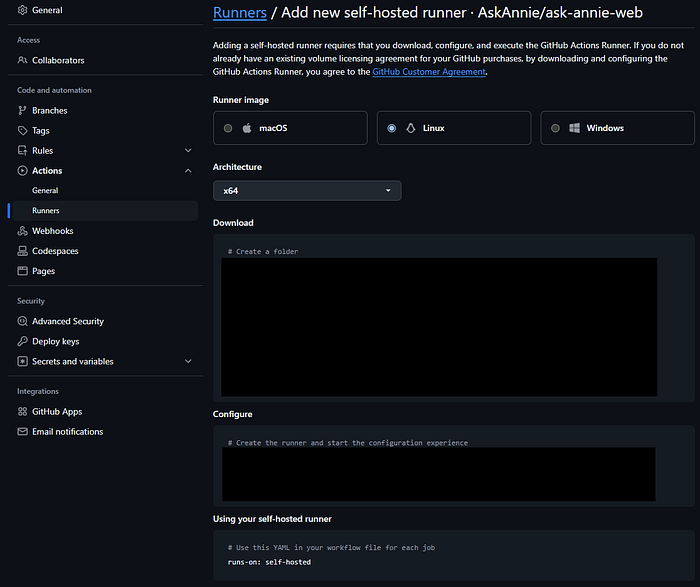
- In your GitHub repository, navigate to Settings > Actions > Runners.

- Click “New self-hosted runner”
- Select “Linux” as the operating system.
- Follow the provided instructions to download, configure, and run the GitHub Actions runner on your EC2 instance.
Once installed, set up the runner as a system service to ensure it runs continuously:
cd ~/actions-runner
sudo ./svc.sh install
sudo ./svc.sh start
Verify that the service is running:
sudo ./svc.sh status
Creating the GitHub Actions Workflow
Now, create the workflow definition that will trigger your deployments:
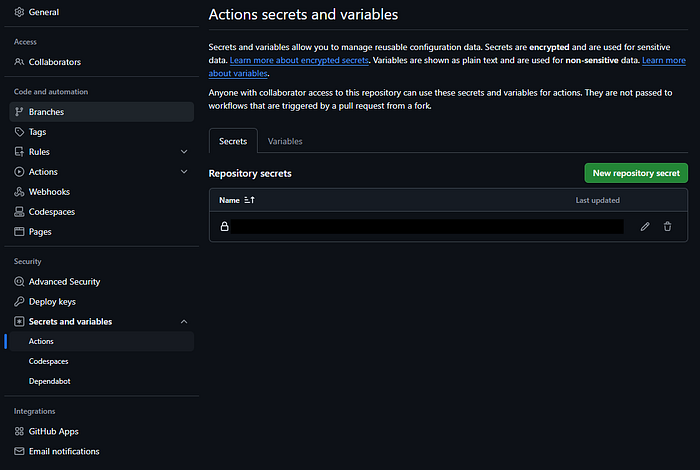
- Add your applications environment variables as a GitHub Secret

- In your repository, create a directory structure
.github/workflows/ - Add a file named
deploy.ymlwith the following content:
name: Node.js CI/CD
# Trigger the workflow on pushes to the "main" branch
on:
push:
branches: [ "main" ]
jobs:
build:
# This job runs on your self-hosted runner
runs-on: self-hosted
steps:
# Step 1: Checkout the latest code
- uses: actions/checkout@v4
# Step 2: Setup Node.js environment
- name: Use Node.js 20.x
uses: actions/setup-node@v3
with:
node-version: '20.x'
cache: 'npm'
# Step 3: Install dependencies
- run: npm ci
# Step 4: Set up environment variables
# This step assumes you've stored your env variables as GitHub Secrets
- run: |
touch .env
echo "${{ secrets.PROD_ENV }}" > .env
# Step 5: Build the project if needed
- run: npm run build --if-present
# Step 6: Restart the application using PM2
- run: pm2 restart node-app || pm2 start server.js --name node-app
This workflow performs several important functions:
- Checks out your code on the EC2 instance
- Sets up the appropriate Node.js version
- Installs dependencies with
npm ci(which is faster and more reliable thannpm install) - Creates an environment file with your secrets
- Builds your application if needed
- Starts or restarts your application with PM2
Configuring Nginx as a Reverse Proxy
Now, set up Nginx to direct incoming web traffic to your Node.js application:
sudo nano /etc/nginx/sites-available/default
Replace the default configuration with:
server {
listen 80;
server_name _;
# For API endpoints
location /api {
rewrite ^\/api\/(.*)$ /api/$1 break;
proxy_pass http://localhost:4000; # Adjust port to match your application
proxy_set_header Host $host;
proxy_set_header X-Real-IP $remote_addr;
proxy_set_header X-Forwarded-For $proxy_add_x_forwarded_for;
}
}
Test the configuration and restart Nginx:
sudo nginx -t
sudo systemctl restart nginx
Part 3: Adding a Custom Domain
A professional application should have a proper domain name rather than an IP address. Let’s configure your application to use your custom domain.
Setting Up DNS Records
- Log in to your domain registrar’s dashboard (e.g., Namecheap, GoDaddy, Route 53).
- Navigate to the DNS management section for your domain.
- Create A records pointing to your EC2 instance:
- Type: A Record
- Host: @ (for root domain)
- Value: Your EC2 instance’s public IP address
- TTL: 3600 (or recommended value) - For the www subdomain:
- Type: A Record
- Host: www
- Value: Your EC2 instance’s public IP address
- TTL: 3600
Updating Nginx Configuration for Your Domain
- Create a new Nginx configuration file for your domain:
sudo nano /etc/nginx/sites-available/default
- Add the following configuration:
server {
listen 80;
server_name your-domain.com www.your-domain.com;
# For API endpoints
location /api {
rewrite ^\/api\/(.*)$ /api/$1 break;
proxy_pass http://localhost:4000; # Adjust if needed
proxy_set_header Host $host;
proxy_set_header X-Real-IP $remote_addr;
proxy_set_header X-Forwarded-For $proxy_add_x_forwarded_for;
}
# For serving static content or frontend
location / {
proxy_pass http://localhost:4000; # Adjust if needed
proxy_set_header Host $host;
proxy_set_header X-Real-IP $remote_addr;
proxy_set_header X-Forwarded-For $proxy_add_x_forwarded_for;
}
}
- Enable the new configuration:
sudo ln -s /etc/nginx/sites-available/your-domain.conf /etc/nginx/sites-enabled/
sudo nginx -t
sudo systemctl restart nginx
Securing Your Application with SSL/TLS
Adding HTTPS encryption is crucial for modern web applications:
- Install Certbot and the Nginx plugin:
sudo apt update
sudo apt install certbot python3-certbot-nginx
- Obtain and install SSL certificates:
sudo certbot --nginx -d your-domain.com -d www.your-domain.com
- Follow the prompts to complete setup, choosing to redirect all HTTP traffic to HTTPS.
- Certbot automatically configures renewal, but you can test it:
sudo certbot renew --dry-run
After SSL configuration, your Nginx setup will be updated to handle HTTPS connections securely.
Part 4: Verifying and Testing the Deployment
After completing the setup, it’s time to verify that everything works as expected:
- Push a change to your repository:
git add .
git commit -m "Test CI/CD deployment"
git push origin main
- Monitor the GitHub Actions workflow in your repository’s Actions tab.
- Once the workflow completes, visit your domain or EC2 public IP address to verify that your application is running correctly.
- Check the PM2 status on your EC2 instance:
pm2 status
Advanced Optimizations
To further enhance your deployment, consider these advanced optimizations:
Allocating an Elastic IP
An Elastic IP ensures your application remains accessible even if your EC2 instance is restarted:
- In the AWS Console, navigate to EC2 > Elastic IPs.
- Allocate a new Elastic IP address.
- Associate it with your EC2 instance.
- Update your DNS A records to point to this new Elastic IP.
Implementing a CDN
For applications serving users across different geographic regions, a CDN can significantly improve performance:
- Set up AWS CloudFront or another CDN service.
- Configure the CDN to use your domain as the origin.
- Update your DNS records to point to the CDN distribution.
Setting Up Monitoring and Logging
Implement monitoring to stay on top of your application’s health:
- Install a monitoring agent like AWS CloudWatch or set up Prometheus.
- Configure alerting for critical metrics like CPU usage, memory utilization, and disk space.
- Set up centralized logging with tools like CloudWatch Logs, ELK Stack, or Graylog.
Common Troubleshooting Tips
If you encounter issues during setup, check these common problem areas:
- DNS Resolution Issues: Use
nslookup your-domain.comto verify DNS propagation. - Connection Refused Errors: Check that your security groups allow traffic on the necessary ports.
- Application Not Running: Check PM2 logs with
pm2 logs node-app. - Nginx Configuration Problems: Review error logs with
sudo tail -f /var/log/nginx/error.log. - SSL Certificate Issues: Ensure that Certbot completed successfully and check for certificate errors in browser developer tools.
Conclusion
You’ve now set up a professional-grade CI/CD pipeline for your Node.js application on AWS EC2, complete with a custom domain and HTTPS encryption. This automation will save you countless hours of manual deployment work while ensuring consistent and reliable updates to your application.
By leveraging GitHub Actions, you’ve created a streamlined workflow that automatically deploys your code whenever changes are pushed to your repository. This approach facilitates rapid iteration and helps maintain a consistent development experience across your team.
The addition of a custom domain with SSL/TLS encryption provides a professional appearance and ensures secure communication between your users and your application. Remember to maintain your infrastructure by keeping your server updated and monitoring your application’s performance.
For more advanced scenarios, consider exploring container-based deployments with Docker and Kubernetes, which can provide even greater flexibility and scalability for complex applications.
Happy coding and deploying!